There’s much debate over how many of America’s greatest recipes got their name, but that’s not an issue with Oyster Rockefeller. Thanks to the rich, money-colored butter sauce, this decadent creation’s name pretty much wrote itself.
Besides the obvious, superficial reasons, associating your new shellfish appetizer with the most affluent family of the day was a stroke of social media genius. Hey, just because Twitter wouldn’t be invented for another 107 years doesn’t mean people didn’t “retweet” things.
When Jules Alciatore invented the dish in 1899, he wasn’t trying to create a classic, new American shellfish appetizer; he was simply trying to replace snails in his diet. That’s right, what would become America’s greatest seafood appetizer (sorry, crab cakes) was just a delicious work-around for a serious shortage of French snails in New Orleans.
To say the customers of Antoine's were happy with this local substitution would be a huge understatement. They went crazy for it. The dish quickly gained national attention, with the most famous celebrities, politicians, and foreign dignitaries of the day stumbling over each to get a plate or three.
The original secret recipe really is a secret; so all versions, including mine, are just guesses. There is agreement among foodies who study such matters that spinach was not part of the formula, but the much spicier and more flavorful watercress was used.
Neither were mushrooms, bacon, ham, cheese, garlic, or any other later day add-ons. Not that those ingredient aren’t good baked on top of oysters, but that just wasn’t how Mr. Alciatore rolled. So if you are looking for a special occasion appetizer that tastes, looks, and makes you feel (and sound) rich, then I hope you give this oyster Rockefeller recipe a try. Enjoy!
Makes enough for about 3 dozen oysters Rockefeller:
1 stick butter (1/2 cup) room temp
2 tbsp minced green onions, white and light green parts
2 tbsp diced celery
2 tbsp fresh chopped tarragon
2 tbsp fresh chopped Italian parsley
1 cup chopped watercress leaves
salt, pepper, and cayenne to taste
2 tbsp Pernod liquor
1/4 cup bread crumbs
3 dozen oysters on the half shell
View the complete recipe
Bonus How to Open Oyster Video!
My friend Tamar, from Starving Off the Land, does a much better job of showing how to open oysters, but that’s only because she raises them and gets a lot more practice! That, and she’s better at it. Also, a special thanks to Sky Sabin Productions for their fine work on this.
For some additional shucking info, and tons of oyster recipe links, you can also check out this article on Allrecipes.com. Enjoy!
Senin, 24 Desember 2012
Candy Cane POP ROCKS Mocha Truffles
POP ROCKS !?!...GENIUS
i can't believe i found CANDY CANE POP ROCKS !!!
what a throw back. yes...they're still out there. i snatch them up whenever i come across a bag. although they usually get eaten up before i can try anything with them, the candy cane ones were hidden in an unassuming brown paper bag......just waiting.
they come in all sorts of fun flavors. there's so many fabulous ideas for them, but these screamed HOLIDAY and i'm obsessed with truffles for the moment. so i put the two together for...
an explosive truffle inside and out.
CANDY CANE POP ROCKS MOCHA TRUFFLES
8 oz good dark chocolate
3/4 cup whipping cream
1/2 tsp vanilla paste(or extract)
1/2-3/4 tsp espresso powder
POP ROCKS
tempered dark chocolate for dipping
put chocolate in a glass bowl.
add espresso powder to cream and heat to almost boil.
pour hot cream over chocolate. let sit for a moment. add vanilla bean paste/extract and start stirring from the middle until the chocolate and cream come together. i used a whisk and stirred to completely incorporated. let come to room temp and give it another stir. put in the fridge, uncovered. come back to it in an hour and give it another stir. now cover it. let it completely set for at least a few hours or over night.
when your ready...make into 3/4 inch bails. USE THIN RUBBER GLOVES.
NOTE...some people suggest you put them in the fridge and dip them when they are cold. i find that they tend to split or seep out of their chocolate shell after "set"at room temperature...so if possible try to dip room temperature truffles.
this recipe seems to hold it's shape at room temperature and should be fine for dipping.
by the way...ALWAYS WORK IN A COLD ROOM.
dip into "TEMPERED" dark chocolate.
check this post for Tips and Tricks on microwave tempered chocolate. or go to About.com candy
sprinkle with Pop Rocks before the chocolate sets. you might need to sprinkle more on before serving because, as you can see in the photos, the rocks melt a bit...that's OKAY...it looks like candy cane lava AND
THEY STILL POP !
Minggu, 23 Desember 2012
Velvety Cream of Asparagus Soup...non dairy
a perfect soup for a chilly night after you've had a big lunch out with the relatives.
soup is always a great make-ahead meal to have on hand for a quick comfort food dinner when you're just too tired to lift a finger...
to whip up an easy pureed soup with just about any favorite vegetable, all you need are a few staples in the kitchen
a few staples for a simple easy pureed soup...
HOMEMADE ROASTED CHICKEN STOCK
in the freezer at all times...
never throw away a good roasted chicken carcass. break the carcass down and save in the freezer. when you have a few throw them in a big pot with water to cover and make up a batch of homemade stock. just the carcass, skin and bones with some water. cook it down for a few hours. the viscosity you get from all those roasted bones and cartilage is the best, hands down.
A BULB OF ROASTED GARLIC
always tucked in the back of the fridge...
cut the top off, pour some olive oil on cut sides and wrap in foil. throw it in the toaster oven for 40 minutes on 370 F. remove cloves from skins and refrigerate in a small container covered with olive oil. use a few cloves when ever you need that extra "took me all day" flavor.
SHITAKI MUSHROOM POWDER
hiding in the cool dark pantry...
i buy the big container of dried shitaki mushrooms from Costco. put a good handful in the toaster oven on low for a few minutes to insure they are good and dry. then put them in a spice grinder and pulverise until it is powder. store in an airtight container in the pantry.
A HIGH POWERED BLENDER...
proudly displayed on the counter top...
not to sound like an infomercial or anything, but i highly recommend the VITAMIX. i used to use my immersion stick blender for purees, but for this Asparagus Puree i thought i'd try the Vitamix. i was truly amazed at the difference. absolutely velvety smooth. so much creamier than my others. creamy...with no added cream...BIG difference.
proudly displayed on the counter top...
not to sound like an infomercial or anything, but i highly recommend the VITAMIX. i used to use my immersion stick blender for purees, but for this Asparagus Puree i thought i'd try the Vitamix. i was truly amazed at the difference. absolutely velvety smooth. so much creamier than my others. creamy...with no added cream...BIG difference.
NON DAIRY CREAM OF ASPARAGUS SOUP
1 pound of blanched asparagus (salted water)
1/2 yellow onion, sauteed in olive oil
2 cloves roasted garlic
2 Tbsp shitaki mushroom powder...see note above
1 tsp fresh tarragon, minced
1 tsp fresh thyme leaves
3 1/2 - 4 1/2 cups homemade chicken broth, depending on how thick you like your soup.
blanch asparagus, saute 1/2 onion, roast garlic, bring broth to a boil.
cut tips off asparagus and save for garnish.
add everything to the Vitamix/blender...or you can use an immersion blender (see note about blender vs. immersion/stick blender above).
puree until very smooth and creamy. add more stock if too thick.
salt and pepper to taste.
serve with asparagus tips and a sprinkle of very fine chiffonade of tarragon.
after thought...maybe a tiny zest of lemon would work well...
On the night before christmas...

...we're eating ribs. This year, we're not really having one huge christmas dinner on actual christmas (which is celebrated on the 24th in Sweden) but instead, stretching it out over several days. (And we had a big christmas smorgasbord a few weeks ago, with friends. More on that when I get to the actual camera. Yeah.)
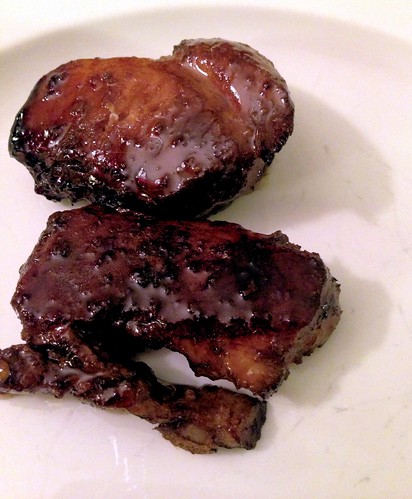
So tonight, we had ribs. If you're having ribs in Sweden, chances are about 99% that they'll be pork ribs. Beef ribs, for some reason, are not sold here. I'm sure you can special order, but I've never gotten around to it. However, pork ribs are abundant, and always in season. Although, in the summer, you can usually find the thin kind, and this time of year, thick-cut. And, much to my happiness, I managed to find pre-cooked ones in my store, already sous-vided. Pretty convenient. (Although not a great value, small packages and lots of fluid.)
I simply tossed them with a simple glaze and baked. Turned out delicious!
Christmas Ribs
serves 2
about 400 g cleaned pork ribs, thick-cut, pre-cooked (My packages said over 1 kilo, but once cleaned and the bones cut off, there was about 400 g meat remaining)
1 orange, grated zest and juice
fresh ginger, about a thumb-sized piece, grated
1 garlic clove, grated
1 tbsp soy sauce
2 tsp brown sugar
1 tsp sambal oelek (chili paste)
1 tbsp neutral cooking oil
Mix all the ingredients for the glaze. Cut the ribs into smaller pieces and toss with the glaze. Place in a roasting pan and bake at 200°C for 20 minutes. Turn the ribs over about halfway through, to make sure they get enough glaze on them.
Serve as part of a larger meal or just as a main dish. We ate it with a very zippy cole slaw that had lots of onions and an apple. Yummy!
Majestic Bay Seafood Restaurant for Dim Sum
![]() |
| I'm back at the Majestic Bay Seafood Restaurant again. The last time I had the Signature Kopi Crab but this time round, I'm back with my family for the dim sum. This photo shows Majestic Bay Seafood Restaurant. Do you see HY and little Julien waving at me from inside? Just kidding. We thought of having a la carte dim sum but we found out that the dim sum set menu was worth every dollar and decided to go for the plunge. The dim sum menu is S$28 per person.. |
![]() |
| The complimentary wasabi potato chips that was so addictive that we wiped out the plate in double quick time. |
![]() |
Not quite there yet. This is not one of the dish in the dim sum set menu. This was the extra dish, the 辣椒蟹生煎包Seared Chilli Crab Meat Bun, that we ordered. |
Dim Sum Set Menu - S$28 per person
![]() |
| 煎萝卜糕 Fried Radish Cake |
![]() |
| 煎腐皮卷 Prawn Beancurd Roll. |
![]() |
| 烧卖 Siew Mai Dumpling |
![]() |
| 叉烧包 Honey Pork Bun |
![]() |
| 瓦煲老火汤 Soup of the Day I borrowed the photo from my previous visit but the claypot looked the same. What you get here will be traditional Cantonese soup. This may be different from each visit. |
![]() |
| 猪腩排咖啡香 Wok Fried Pork Ribs with Espresso Sauce Just like the Kopi Crab I had before, this is an acquired taste. The espresso sauce is a novelty but not everyone appreciates it. |
![]() |
| 姜丝盐水浸菜远 Poached Hong Kong Choy Sum, shredded ginger and superior stock. |
![]() |
| 白雪红酶 Chillee Glutinous Rice Dumpling, Fresh Cream Stuffing If you like chewy mochi, you gotta like this. Soft and almost melting in my mouth. |
18 Marina Gardens Drive #01-10
Flower Dome, Gardens By The Bay
Singapore 018953
Tel : +65 6604 6604
Sabtu, 22 Desember 2012
Rosemary Almond Salted Caramel Chocolates
ROSEMARY and CHOCOLATE...
FABULOUS COMBO
add some smoked salt caramel and roasted almonds?...done deal
just trying to squeeze in as many chocolates as possible before it's too late. i'm obsessed with tempering chocolate, learning new tricks and trying new flavors.
although chocolates make great gifts anytime of the year, this one looks and tastes very "winter holiday-ish".
if you temper your chocolate they will keep for quite a while and package up nicely with a little fresh sprig of rosemary...nice aroma burst when opening the bag. there's no dipping involved and the only pain is going the extra step with the caramel center...but trust me, the oozing caramel is a fabulous hidden surprise.
BIG NOTE...if i have left anything out of the recipe or instructions in my mad dash to get this post done before X-mas...or you have any questions, please leave a comment and i will get back ASAP.
my measurments might not be exact...i tend to have all these things on hand during treat making time and sometimes i throw in extra here and there.
ROSEMARY ALMOND SALTED CARAMEL CHOCOLATES
makes about 25 depending on size
1 pound good DARK chocolate, tempered
1 cup (have extra on hand) roasted salted almonds, chopped
7-8 oz. Werther's chewy caramels
1 Tbsp cream
1 1/2 tsp fresh oven dried rosemary, minced as fine as possible
smoked salt
cumin
do your caramel first. unwrap caramel pieces and put in a microwave safe glass bowl with 1 Tbsp cream. melt in small increments and stir in between so as not to over heat...heat and stir until combined and liquid. pour onto light sprayed parchment paper and sprinkle with a little rosemary, smoked salt and cumin. put in fridge to set for about 1 hour.
when set...make small balls of caramel. roll in a little bit of chopped almonds. make about 30 of these small balls. you don't want this ball too big because it has to fit in the cup and be covered with another layer of chocolate. refrigerate caramel balls so they do not spread. if they DO spread, just ball them up again before placing in chocolate.
NOTE...it's helpful to have the caramel balls separate and ready when the chocolate is ready.
put paper cups in a mini muffin tin...makes them stable and easier to deal with. set aside.
temper the dark chocolate. click HERE for "how-to microwave temper and Tips and Tricks information.
mix about 3/4 cup chopped almonds and about 1 tsp. of rosemary into tempered dark chocolate.
spoon a small amount into paper cups...do one tray of 12 at a time. now put a small caramel/almond ball in the cup on top of chocolate. push in ever so slightly. cover with another spoonful of chocolate/almond mixture. tap the tray on your work surface gently a few times. if any caramel is showing add more chocolate mixture to cover. you can sprinkle a few almonds and some smoked salt on top or just leave to set. if your room isn't cold enough, put the chocolates in the fridge for about 15 minutes...then remove from fridge. if tempered, they will be fine at room temperature.
ANOTHER NOTE...you might want to do a taste tester...make one up and stick it in the freezer for a quick set. see if you need to add some more rosemary?...salt?
also...you might have left over caramel...but i'm sure you'll find a few takers to polish it off.
Broccoli & avocado salad

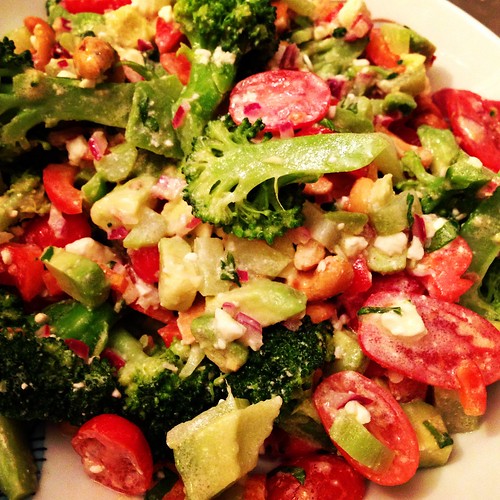
I hope you're not sick of christmas food, because I still haven't managed to transfer the photos from my camera of some new dishes I've made recently. But I will, I promise. Meanwhile, have some salad! This is a pretty hearty thing, that we ate with steaks and some roasted potatoes. It's absolutely delicious, and would be a good stand-alone dish as well.
Broccoli & avocado salad
serves 2-4 depending on what else you serve
1/2 red onion
1 lemon
Salt
1 head of broccoli
2 tbsp sour cream
1 tbsp olive oil
1/2 red pepper, diced
10 cherry tomatoes, quartered
Handful basil, finely sliced
Handful cashews
1-2 avocados, diced
50 g feta cheese, crumbled
First, finely chop the red onion, and mix with the squeezed-out lemon in a bowl. Season with a pinch of salt, too.
Next, separate the broccoli into small florets. Peel the stalk and discard the tough outsides, but slice the rest. Cook for three minutes, then plunge into cold water to stop the cooking.
Add the sour cream and olive oil to the lemon dressing, and mix well.
And then - assemble. Just mix everything together, but make sure to don't break up the avocado too much. Use a light hand!
Ho Ho Ho.
Merry Christmas and Happy New Year and Happy Holidays and Merry Eating Fest.
I will try to drop in sporadically from Minnesota and New York and give you updates on what I'm putting into my stomach. Cause you care? xo
Jumat, 21 Desember 2012
Classic Lobster Bisque – Finally!
I usually don’t have a good answer for why I’ve not gotten around to filming certain iconic dishes like risotto, beef Wellington, and puff pastry; but when it comes to lobster bisque, I do have a great excuse.
I won’t bore you with the details of how the tradition started (translation: I don’t remember), but for as long as I can remember, I’ve always made lobster bisque on Christmas Eve, to celebrate my sister-in-law Jennifer’s birthday.
And since the few days leading up to Christmas are always so busy and hectic with shopping, cooking, and travel, I’ve just never felt like I’ve had the time to set up the camera to properly film the procedure. Well, this year I decided to give it a go, and despite all the aforementioned challenges, I was very happy with how this came out.
One word of warning: this recipe requires live lobsters, brandy, and heavy cream. If you can’t get, or don’t want to use those ingredients, then you’ll have to make something else. Sorry, but this recipe is too sacred for substitutions.
Speaking of live lobsters, I know many are skeptical that these “bugs” can actually feel pain, but to play it safe, I recommend putting them in the freezer for 20 or 30 minutes to knock them out cold before their ultimate demise.
I only showed the cracking and the picking of the lobster meat very briefly, as this video was already too long for my tastes, but below I’ll link an additional tutorial that show this in more detail. Yes, this soup takes a little bit of work and expense, but I think you’ll agree with me (and Jennifer) that all the effort is well worth it. Enjoy!
Makes about 1 1/2 quarts:
2 live lobsters (about 1 1/2 pounds each)
1 onion, chopped
2 rib celery, chopped
3 quarts cold water (this will reduce by about half during the entire cooking process)
3 cloves garlic
4 springs fresh thyme
1 bay leaf
1 cup crushed tomatoes
1/4 cup tomato paste
2 tsp paprika
1/3 cup white long grain rice
2 tbsp cheap brandy (inexpensive brandy tends to be a little sweeter, and works well here)
1/2 cup heavy cream, or more if you like it creamier
salt and cayenne to taste
1 tbsp chopped tarragon to garnish
I won’t bore you with the details of how the tradition started (translation: I don’t remember), but for as long as I can remember, I’ve always made lobster bisque on Christmas Eve, to celebrate my sister-in-law Jennifer’s birthday.
And since the few days leading up to Christmas are always so busy and hectic with shopping, cooking, and travel, I’ve just never felt like I’ve had the time to set up the camera to properly film the procedure. Well, this year I decided to give it a go, and despite all the aforementioned challenges, I was very happy with how this came out.
One word of warning: this recipe requires live lobsters, brandy, and heavy cream. If you can’t get, or don’t want to use those ingredients, then you’ll have to make something else. Sorry, but this recipe is too sacred for substitutions.
Speaking of live lobsters, I know many are skeptical that these “bugs” can actually feel pain, but to play it safe, I recommend putting them in the freezer for 20 or 30 minutes to knock them out cold before their ultimate demise.
I only showed the cracking and the picking of the lobster meat very briefly, as this video was already too long for my tastes, but below I’ll link an additional tutorial that show this in more detail. Yes, this soup takes a little bit of work and expense, but I think you’ll agree with me (and Jennifer) that all the effort is well worth it. Enjoy!
2 live lobsters (about 1 1/2 pounds each)
1 onion, chopped
2 rib celery, chopped
3 quarts cold water (this will reduce by about half during the entire cooking process)
3 cloves garlic
4 springs fresh thyme
1 bay leaf
1 cup crushed tomatoes
1/4 cup tomato paste
2 tsp paprika
1/3 cup white long grain rice
2 tbsp cheap brandy (inexpensive brandy tends to be a little sweeter, and works well here)
1/2 cup heavy cream, or more if you like it creamier
salt and cayenne to taste
1 tbsp chopped tarragon to garnish
Bonus Lobster Meat Recovery Video:
This video shows the picking of the lobster meat in much more detail than I did. Since they are boiling the lobster, you can just skip to the part where he is liberating all the meat. For more general lobster info, you can also check out this page on Allrecipes.
Dark Chocolate Aztec Truffle Bon Bons
no need for mistletoe this year with...
A FLAVORFUL PUNCH IN THE KISSER
smoky espresso chocolate, bright sunny orange zest, warm cinnamon and a kick of chipotle.
who doesn't love a few homemade "bon bons" around the holidays ?
8 oz. good dark chocolate
3/4 c. heavy cream
1 1/2 Tbsp chipotle in adobo...(see NOTE)
1/2 rounded tsp cinnamon
1/2 tsp espresso powder
2 tsp karo syrup...optional
1/2 tsp vanilla bean paste
zest from 1 small orange...maybe a little less
NOTE about chipotle...use chipotle with adobo in the can. push 3 chipotle peppers, dripping in adobo sauce, through a medium fine strainer. you want to end up with almost 2 Tbsp.
in a small sauce pan...add heavy cream, strained chipotle, espresso powder, cinnamon and orange zest. bring to almost boil. stir, or whisk to combine while heating.
put chocolate in a medium glass bowl and add vanilla bean paste and Karo syrup. Karo syrup is optional. pour cream mixture through a strainer over the chocolate. press the cream through strainer with a spatula. let it sit for a minute or 2. start to stir in the middle. keep stirring until you see it is well combined and you have a nice shiny ganache. TASTE TEST. at this point i added a bit more zest and a sprinkle of cinnamon. you be the judge.
put in the fridge for and hour or 2...come back and give it a stir. let sit over night or at least a few more hours to REALLY SET.
when it is quite firm...make into 3/4 inch balls...do this with thin rubber gloves if possible. the warmth of your hands really creates a mess. refrigerate truffles for about 1 hour.
at this point you can roll a few in cocoa powder for a different look, but the crisp dark chocolate outer layer really lends to the whole chocolate experience and is worth the effort.
before dipping, take them out of the fridge while you are preparing to temper. i have found dipping near room temperature truffles prevents the seepage that can happen and cause the need to repair and double dip.
please click HERE for some "tips and tricks" (post about Spicy Chocolate Bacon) on tempering and making your chocolate a successful experience.
NOTE...you will have left over "tempered chocolate". be prepared with other goodies to dip, like pretzels, cookies, BACON or throw a bunch of stuff in and make bark.
you'll need 1 pound of "coverture" chocolate. i use Guittard 61% dark chocolate discs in a 1 pound box.
put in the fridge for and hour or 2...come back and give it a stir. let sit over night or at least a few more hours to REALLY SET.
when it is quite firm...make into 3/4 inch balls...do this with thin rubber gloves if possible. the warmth of your hands really creates a mess. refrigerate truffles for about 1 hour.
at this point you can roll a few in cocoa powder for a different look, but the crisp dark chocolate outer layer really lends to the whole chocolate experience and is worth the effort.
before dipping, take them out of the fridge while you are preparing to temper. i have found dipping near room temperature truffles prevents the seepage that can happen and cause the need to repair and double dip.
please click HERE for some "tips and tricks" (post about Spicy Chocolate Bacon) on tempering and making your chocolate a successful experience.
NOTE...you will have left over "tempered chocolate". be prepared with other goodies to dip, like pretzels, cookies, BACON or throw a bunch of stuff in and make bark.
EASY MICROWAVE TEMPERING...(dark chocolate)
adapted from Alton Brown's Microwave Tempering Method found HERE. he uses "pure cocoa butter". i find seeding with 1/4 of your chocolate quantity works well.
you'll need 1 pound of "coverture" chocolate. i use Guittard 61% dark chocolate discs in a 1 pound box.
put 12 oz. of the chocolate in a glass bowl. set 4 oz aside.
microwave chocolate for 30 seconds. STIR. microwave again for 30 seconds...STIR. one more time 30 seconds...STIR. now microwave for 15 second intervals (should be 2-4 times) stirring between each run until it reaches 100 F. STIR. microwave for 10 second intervals (maybe 2-3 times) until it reaches 115 F for dark chocolate.
stir in the other 4 oz. of chocolate. stir well with spatula, cleaning the sides of the bowl and incorporating the chocolate. the fresh chocolate will soon melt and will bring the temperature down. this process is called "seeding". i read that a lot of stirring helps bring back the sheen...so i stir well. you are looking for 90 F degrees. at this point your chocolate is dip-worthy.
at 90 F place the chocolate bowl in another bowl lined with a dishtowel...this is to help keep your chocolate warm and snugly while working. STIR chocolate periodically. if it is getting too thick, take the temp. give it a shot with the hot blow dryer and STIR to keep from getting hot spots. do not reheat the chocolate too fast or too high. it will lose it's temper.
start dipping. use a fork or dipping tool to lift out. lightly tap on the edge of the bowl and let excess chocolate drip off and place on prepared parchment. sprinkle with smoked salt while the chocolate is still wet. do about 4-5 balls at a time so you can get your salt on before the chocolate sets. stick in the fridge for about 10-20 minutes if necessary. then let come to room temp before putting them in an air tight container. do not close them up with condensation on them.
i do not know exactly how many days these will last at room temp. probably at least a week. they can be prolonged in the fridge, but they should come to room temp "no condensation" before packaging up for gifts.
Kamis, 20 Desember 2012
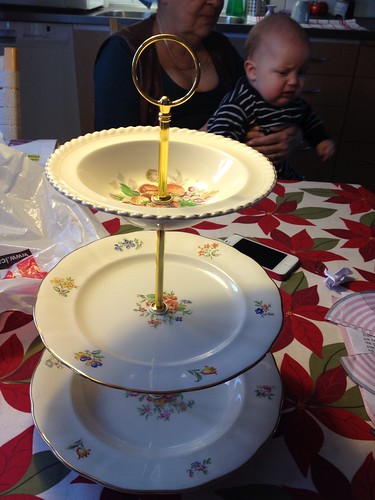
My own tiered cookie plattar

I've been wanting a tiered cookie stand for years, but never really got around to it. I couldn't find one I loved, and since they take up so much space, I want to make sure it's something I can use a lot.
So. When I found out you can buy the pieces to make your own cookie platters, I knew just what to do! Find my grandmother's old plates, of course! And so I did. They don't match perfectly as you can see, but it's good enough for me. It's lovely and unique!
It's easy enough to make. You need to drill holes in the exact middle of your plates, which is the only fiddly part. (I had my dad help me with this, he's very precise and that's definitely necessary.)
You can buy these from the Swedish site kakfateriet.se (I'm not compensated in any way to write this, I just like the idea a lot). I'm guessing it's available from other sources too, but that's where mine are from.
Giving the Gift of Experience 2012
I'm sure you've heard that experiences are appreciated and more memorable than things. Speaking personally, I have no more room for stuff. If it doesn't fit in the refrigerator or my jewelry box, it's going to be tough to find a place in my overstuffed apartment. But a tour or a class is something I always appreciate. You know what they say, give a man a fish and you feed him for a day, teach a man to fish and you feed him for a lifetime.
Here are my ideas for the best experiences in San Francisco and beyond...
| A stop at Craftsman & Wolves for a treat |
Neighborhood food walking tours are not just for tourists! In fact, most of the people who go on Edible Excursion tours are locals. Even if you know your own neighborhood, have you really dug into Japantown or the up and coming parts of the Mission? Nothing could be better than going with an expert.
I've been on several of Edible Excursions tours and loved all of them. The most recent tour is of the 18th Street corridor and what could be more fun than hanging out with one of the tour guides, local DIY diva Karen Solomon! She not only lives in the Mission but can make great personal recommendations for where to eat, drink and shop in the area. See the murals at the Women's Building, nibble on pizza, slurp a sangria and have a lick of ice cream all the while learning about new and not so new hot spots on 18th Street and Valencia Street. Tours range from $50-75 and are well worth the price given how much food you'll eat and fun you'll have.
San Francisco Cooking School
Just last month I got a chance to take a tour of the newly launched school and to chat with some of the instructors. I was really impressed. The space on Van Ness is gorgeous and the teachers experienced and enthusiastic. What sets this school apart is that even the classes for non-professionals are hand's on, not just demos. Learn how to make and decorate cupcakes from Kara of Kara's Cupcakes! Learn to make pasta from Viola Buitoni! Buitoni, a name synonymous with pasta. Make Asian dumplings with Andrea Nguyen, author of the book, Asian Dumplings.
The Boothby Center for the Beverage Arts
I have a confession to make, I am lousy at creating cocktails. Oh I can follow a recipe like anyone else, but coming up with something new is a challenge. I love learning about spirits and playing with them. In San Francisco we actually have a non-profit organization dedicated to to preserving the cultural heritage of saloons and their cocktails in San Francisco, while also celebrating California's culinary philosophy and tradition via special public events, publications and educational seminars. I would LOVE to take a class with one of my (and I think everyone's) favorite local bartenders, Reza Esmaili and learn to make market fresh cocktails! But check out the schedule and find something that rings your bell.
Forage SF
I've been fascinated by the foraging trend. I grew up in the Bay Area and ate fish and seafood, mushrooms and fruit all harvested locally by family and friends. I've been on many nature walks and mushroom hunts and always learned a lot. Forage doesn't just hold markets and dinners, but wild food walks. They are two hours, held in both San Francisco and the East Bay and cost only $40. If no one buys me this as a gift, I plan on buying it for myself!
Autumn in Italy
Are your ready for the trip of a lifetime? I just came back from Emilia Romagna, and created a slide show for Frommer's on what has to be one of the best food destinations in the Italy. My friends and fellow bloggers and Italian food enthusiasts Hedonia blogger Sean Timberlake and Italy in SF blogger Vanessa DellaPasqua who runs Global Epicurean have put together a second trip to Italy (on the heels of their sold out first trip), this time to focus on gathering porcini mushrooms, but also to try formaggio di fossa, visit a tartufo festival, learn to make pasta and piadina and of course get up close and personal with Parmigiano Reggiano, prosciutto and balsamic vinegar in their birthplace. And so much more! Check out the full itinerary and make someone's dream come true.

Langganan:
Postingan (Atom)