Search

Tampilkan postingan dengan label bacon. Tampilkan semua postingan

Rabu, 23 Oktober 2013

Dark Chocolate Breakfast Bar


CHOCOLATE FOR BREAKFAST !!!
with granola, hickory smoked BACON, espresso beans and pecans

what self respecting chocolate lover doesn't dream about chocolate?

well, now you can wake up, enjoy your chocolate and feel fabulous about the day ahead.

A GOOD DAY STARTS THE CHOCOLATE WAY!


CHOCOLATE IS THE CURE ALL
of course there are health benefits in dark chocolate.  pecans have their omegas, bacon has protein...HA HA...and granola is...granola,
but the best part about chocolate is that "moment"
that feeling that everything is gonna be okay

WHY NOT START YOUR DAY WITH ONE OF THOSE MOMENTS...


THE DARK CHOCOLATE BREAKFAST BAR

1 pound of good dark chocolate.  i use Guittard 61% coverture discs
BACON...about 8-10 slices cooked crispy and chopped or crumbled
1 1/2 cup of good plain (gluten free) granola
1/2 cup "sweet-spicy" pecans, some cut, some whole.  try Trader Joe's
1/2 cup chocolate covered espresso beans
1/8 cup cocoa nibs
1/4 tsp hickory smoke flavoring in a bottle
1/8 tsp chipotle powder...a little more maybe?
1/4 to 1/2 tsp cinnamon
smoked sea salt for top sprinkle.  try Maldon's flaked

NOTE...have extra goodies (granola, pecans, bacon etc.) on hand in case your mixture looks too "soupy".  ingredient size and shape can vary.

prepare an 8x8 inch square pan.  lightly butter the bottom and sides. this will help hold the parchment to the sides.  line the bottom and two sides with "the parchment sling" (baking tip from Suzie Sweet Tooth).


TEMPER YOUR CHOCOLATE!
this is rather important in my opinion.
tempering keeps your chocolate fresh and snappy instead of a melting blotchy mess.  it will keep at room temperature and be a lot more enjoyable to wrap and give away...TRUST ME.
this is not a hard thing to do.  i think the "microwave method" is easiest.  see my tempering instructions HERE or visit Alton Brown's instructions HERE.
IN A NUT SHELL... you will slowly melt the chocolate, bring it up to 115 degrees (for dark) and slowly lower the temp to 90 degrees before using...but please click on link for instructions.


once your chocolate is tempered and at about 90-91 degrees, start to add in your goodies.  NOTE...save a few bits and pieces for a sprinkle on the top.  when adding in the powdered spices like chipotle, i like to do this through a small strainer for more control.  i wouldn't want one person to get a mouthful of heat...right?
also be very careful with the "hickory flavoring".  this can make or break you.  use a light hand with this for the first time using.  i found that just about 1/4 tsp was good enough.
don't go wild with the mixing or everything will lose it's individual unique flavor, ie...the spicy pecans, the smoky bacon and the cinnamon granola.  you want everything including the dark chocolate to shine on it's own.
pour/spoon mixture into prepared pan.  let sit on counter until solid or put in the fridge.  when set, loosen sides with a knife and lift out by the "sling" handles.
cut into desired pieces with sharp clean knife.

Kamis, 05 September 2013

Flourless Chocolate Cake with Dark Chocolate Ganache and Candied Bacon


MY NEW FAVORITE FLOURLESS CHOCOLATE CAKE

i now believe i found the perfect flourless chocolate cake.  as stated before in previous posts...most all flourless chocolate cakes are going to be delicious...that's a given, BUT most are very difficult to serve.  i usually end up with little chocolate crumbles on me, the table, the floor.  chocolate mess is not a bad thing, but i like the presentation to look as good as the cake will taste.

THIS IS A SPECTACULAR CAKE

smooth, rich dark chocolate
fudgy, yet light
not overly sweet
a perfect canvas for extras
serves like a charm
gluten free
a definite crowd pleaser


the original recipe comes from Gourmet Magazine, Nov. '97.
i decided in my usual fashion that it needed a little something extra.  i can't help myself.
Guittard dark chocolate
vanilla bean paste
a little espresso
a sprinkle of cinnamon
and, of coarse...a pinch of chipotle

oh...and don't forget
THE CANDIED BACON !


CLASSIC FLOURLESS CHOCOLATE CAKE
with a spicy Mexican twist
original from Gourmet Magazine Nov. '97

for the cake...

4 oz dark or bittersweet chocolate, chopped small and evenly
(i used Guittard 61% coverture discs)
1/2 cup butter
3/4 cup sugar.   i used super fine sugar
3 large eggs
1 1/2 tsp vanilla extract
1/2 cup good cocoa powder, again...i used Guittard
1/2 tsp(slightly rounded) cinnamon
1/4 tsp ground chipotle powder
1 tsp powdered espresso

preheat oven to 375F.  line an 8 inch cake pan OR i used an 8 inch spring form pan.  line the bottom and sides with parchment and lightly butter or grease the parchment.  the sides might not be necessary, but that's what i did.
in a small bowl add the cocoa powder, cinnamon, espresso and chipotle. whisk to combine and set aside.
in another small bowl add the chocolate and butter.  use either the microwave or a double boiler to slowly melt the chocolate/butter until smooth and shiny.
pour warm chocolate mixture into medium mixing bowl with the sugar.  whisk to combine well.  now whisk in eggs one at a time, waiting until each has been fully incorporated to add the next.  add the vanilla.
sift cocoa powder mixture into the chocolate mixture and whisk until WELL combined.
pour into prepared pan.  bake for approximately 25 minutes.  i turned the cake after 15 minutes.  start watching after 20 minutes.  mine took about 23 minutes.  toothpick should come out clean with moist crumbs attached.
allow cake to cool for 5 minutes.  if necessary, run a knife around the edges and invert onto serving platter.
NOTE...since i was going to ganache the cake i inverted onto a piece of parchment on a cooling rack.
let cake cool completely.


for the ganache...

6 oz good dark chocolate, again Guittard 61% coverture discs
6 oz heavy cream
1 tsp clear corn syrup

prepare your cake for ganaching...choose your "nice side", either the top or the bottom.  put cake on an 8 inch round that you will serve off of.  use cardboard or i used the removable 8" bottom from a tart pan.  set cake on a rack over a sheet pan to catch the ganache "fall-off".  you will want to save this for truffles or just a big spoon-to-mouth.
chop chocolate into even small pieces and set aside in a glass bowl.  (i like to wrap a kitchen towel around the bottom to keep the working ganche cozy).  warm cream and syrup in a small sauce pan until just a boil.  pour hot cream over chopped chocolate and let sit for 1 minute.  begin to gently stir from the middle.  take your time, you will see the ganAche magically come together.  now stir to fully incorporate and there are no lumps and it is nice a shiny.
pour warm liquidy ganache over cake...starting with a pool in the middle and spiral out wards.  work fairly quickly so it does not set.  pick up the cake and jiggle the ganAche so that it covers the whole top.  it is a messy job, but you will get the hang of it.
DO NOT go back and try to fix the top, but you can gently add to the sides where the chocolate might have missed while dripping off.
add chopped CANDIED BACON in the middle for appearance or all over for pure indulgence.   NOTE that the bacon does not make for a clean slice, but i'm sure you can work around it.  LOL !
let cake sit  to set undisturbed until serving.  you may refrigerate, but you must take it out of the fridge at least an hour or two ahead so that the condensation from temperature change slowly disappears.


for the CANDIED BACON....

preheat oven to 390F convection.
this can be done the day ahead, but you will need to re-crisp the bacon in the oven before using.  line a cookie sheet with heavy duty aluminum foil.  lay out as many pieces of bacon you can...extra will disappear before you can get it on the cake.  set timer for 15 minutes, but don't go far the first time trying until you get it down.  remove from oven and pour off excess fat into a heat safe glass dish...you might want to save the bacon fat as I DO to use for "bacon-butter".  flip the bacon.  sprinkle the slices with brown sugar, cinnamon and chipotle powder or chili powder or cayenne if you want some heat.  put back in the oven until good and crispy.  remove from oven and let cool on wire rack.  if it is not crispy enough when cooled...put them in the oven on the wire rack and watch carefully...do not let them burn.  save in air tight container with parchment.  if using them later you might want to re-crisp them a bit.

Sabtu, 31 Agustus 2013

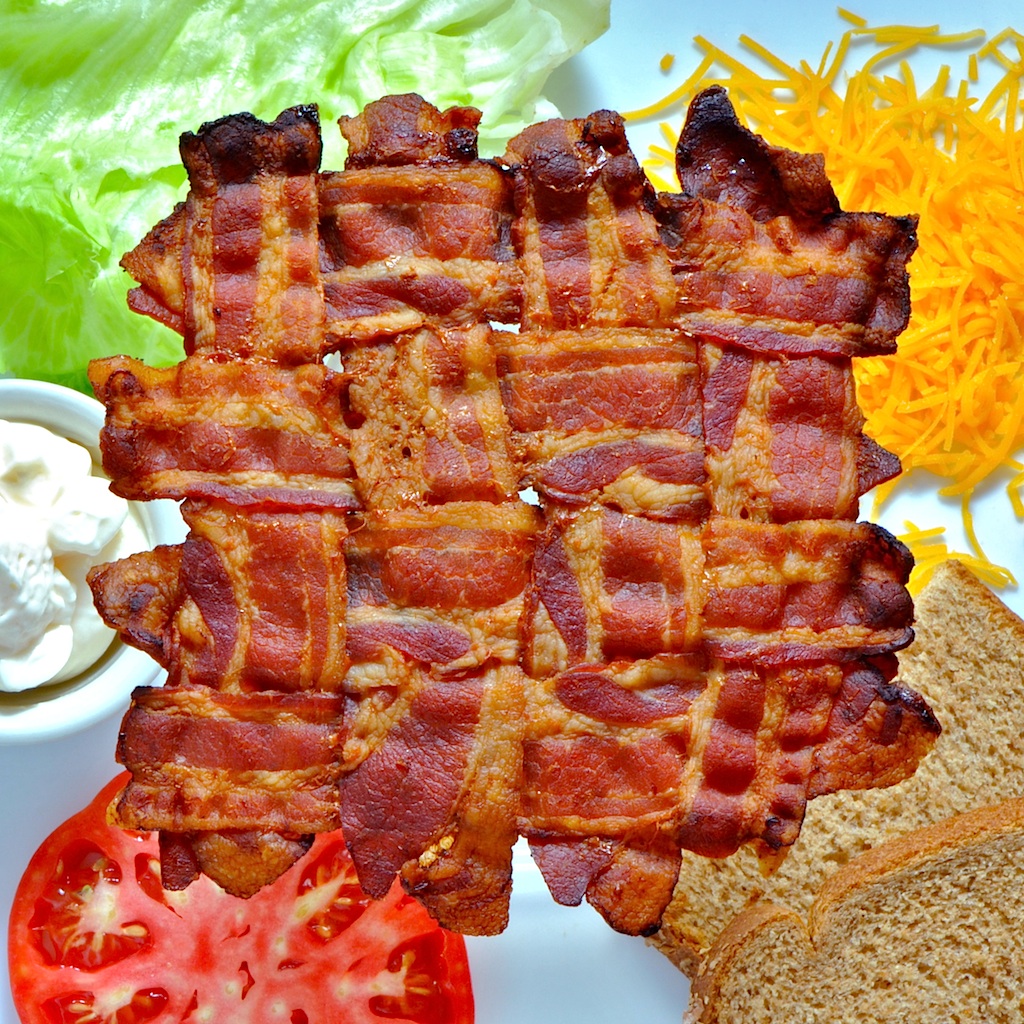
The Perfect Sandwich Bacon...Genius !


YIKES...

NATIONAL BACON DAY ? !

i almost missed it...although i say,

"EAT BACON EVERY DAY !"


BACON IN EVERY BITE
found at DO IT AND HOW

no need to preheat the oven.  you will render more fat if you start cold.  i use a convection oven at 390F degrees.
cover a large cookie sheet with extra strength aluminum foil for easy clean up.
lay out your bacon in 3 or 4 strips close together.  now basket weave in the other 3 or four strips.   just like you would for a pie.
i set my timer for 15 minutes.  remove from oven.  then i make a spout at one end of the tinfoil and pour off as much of the fat (into a small heatproof bowl) with out tipping all the bacon off the sheet pan.
flip the bacon weave over...CAREFULLY, it's HOT.
FOR SPICY CANDY BACON IN EVERY BITE...
OPTIONAL...sprinkle with brown sugar, chili powder, cumin and chipotle powder.
put back in the oven for ABOUT 10 minutes?...it depends on the thickness of your bacon.  the bacon shown was center-cut and was not very thick.  you might want to check it every 5 minutes....or you might want to flip it again.
if your bacon is not getting crisp enough...remove from greasy sheet pan and put on a rack and back in the oven until done to your liking.
if not using right away, they crisp up very well in the toaster oven.  i used mine the next two mornings for some fabulous breakfast egg and cheese burgers.
NOTE...the four sliced (actually 8 slices) was a little large, but so much fun to eat.
i thought about using it for a plate


please check out this DO IT AND HOW.com.  it's a fabulous "How-To" about so many things,
BUT  there are so many great ways to manipulate and use the ever so versatile BACON...i WILL try them all.  taco shells, mini muffin cups, bowls etc...and don't miss the TURTLE BURGERS!
GENIUS I SAY !...BRAVO

Minggu, 11 Agustus 2013

Freaky Frito No Bake with Bacon and Red Pepper Flakes


SO WRONG...yet

SO PERFECTLY RIGHT !!!


everything about this says NO NO NO NO

DON'T DO IT

but you just can't help yourself...

this is a true definition of

GUILTY PLEASURE


FRITOS
chocolate
BACON,
peanut butter caramel
and a sprinkle of HOT chili flakes


YOU MUST TRY THIS !!!
i found this incredibly sinful delight on pinterest brought to my attention by  Skip to my Lou...Cindy i love you i hate you!  these are so GOOD...so BADDDDD and so wrong, yet so right on every level.   perfect sweet savory gooey crunchy in every bite.    friends and family thought i was crazy when i tried to explain what was in it, but first bite had them grabbing for more.  i would, and probably will, bring these to any party be it black tie or pot luck.  


FREAKY FRITO NO BAKE with BACON
and RED PEPPER FLAKES
original recipe and photo instructions found at Skip to my Lou

1 bag of regular Fritos, 10.5 oz
1 cup regular sugar
1 cup light corn syrup
1 cup regular store bought peanut butter...natural won't work the same.
i used half creamy and half crunchy, so both will work.
8-10 strips CRISPY bacon, chopped or crumbled.
chocolate to drizzle
crushed red pepper flakes to sprinkle

spread Fritos on a greased 15 x 10 inch jelly roll pan/cookie sheet.  sprinkle the bacon on the Fritos.  save a bit of bacon to sprinkle on after you pour the caramel mixture for a good visual.
in a small sauce pan add the sugar and corn syrup. bring the sugar and corn syrup to a boil...stirring to help dissolve all the sugar.  let boil for one minute.  remove from heat and stir in peanut butter until smooth.  pour mixture equally over the Frito/bacon.  sprinkle (sparingly) with red chili flakes...as much as you can handle.  maybe just do chili flakes on half so the non heat seeker/pansy will enjoy.   as they are cooling heat some chocolate...(about 1/2 cup or so) slowly in the microwave.  do this at 15 second intervals, stirring in between so you won't seize the chocolate.   it should not be too hot so you can put this in a zip-loc baggie, cut off the tip and drizzle over the whole sheet.  the chocolate will set in a few hours, but since it isn't "tempered" it will still be a little soft to the touch.
i handed these out the next day and they still had a very good crunch...even 2 days later they were good after the photos.  do not cover these tightly.  i have a cover for my sheet pan that i just lay over top.

Sabtu, 13 April 2013

Pig Cheeks wrapped with Bacon, Brown sugar and Onion


MOVE OVER PORK BELLY...

there's a new kid in town.

PIG CHEEK ROCKS !!!

not that this is any new big discovery, but i have just recently fallen in love.  i simply can not explain how unctuous this small little nugget of pig meat is.  i've had beef cheeks before and they are absolutely fabulous in this recipe for Beef Cheek Barbacoa, but they are a bear with all the sinew and fatty bits that need trimming.  the pig cheeks, on the other hand, are small, thin, clean and easy to work with...i buy mine at one of my favorite Asian markets in Irvine, H Mart.


PIG CHEEK wrapped in BACON ?

EVEN BETTER.

the perfect HOG HEAVEN FOR TWO.
but...will serve four generously.


this is what my cheeks looked like.  there was a good layer of fat on the other side of the larger one.  this was almost 1 pound.

FOR THE RECIPE/INSTRUCTIONS...
please read through...some of it is visual
everything is approx. because you never know what size cheeks you're going to find, but this is what you'll need....
FOR THE ROAST...
pig cheeks....3/4 to 1 pound
1/4 white onion, very thin slices
2-3 Tbsp brown sugar
1 tsp kosher salt
fresh ground pepper
a few dashes of cumin
optional...red pepper flakes or cayenne or chili powder or Mrs Dash South Western Chipotle
9-11 slices long bacon...buy the longest, not the center cut
butchers string

preheat oven to 325F.

lay the bacon out as shown.  the bacon strips that will be wrapping around the outside should be on the board first.  the strips that will cover the ends go across.  in my case i had 2 pieces so i dressed the first one (photo above) and laid the 2nd on top (not shown) with a few extra sprinkles of salt, brown sugar and spices.
roll the meat first.  then wrap the bacon that will cover the ends.  next wrap the outer layer.  you might need to cut a little bacon off so as not to over lap too much.
pre-cut your strings so you are not fumbling for the scissors...tie the string around the ends first.  i used two.  then 3 to four strings around the body holding the bacon on.  this is not as difficult as you may think, but an extra hand in the kitchen helps hold things together.

FOR THE DUTCH OVEN...
1 to 1 1/2 green apple, cored and sliced thick
1 to 1 1/2 white onion, sliced thick
enough chicken stock to just cover the onions.
brown sugar to sprinkle on top.
place thick slices of onion and apple on the bottom to act as a trivet or rack and place the roast on top as shown.


the roast in photo was in the oven for approx. 3 1/2 hours total.
roast for 2 hours with the lid on.  check on the roast.  check the liquid.  you don't want the roast sitting in liquid.  roast for another hour.  peek after 30 minutes and give it a poke.  is it fork tender?...is it starting to brown?  if it is fork tender, but not brown, remove the lid, turn up the oven to 350F and watch it so you don't burn the bacon.
mine fully cooked and browned (as shown) in the covered dutch oven about  3 1/2 hours.
remove the roast and carefully remove the onion ringlets with a slotted spoon.  these are delicious pork fat caramelized onions.  if the onions are not browned enough, put the dutch oven uncovered back in the big oven without the roast and cook to your satisfaction...don't forget them in the oven while you are noshing away at the pork roast.

LET THE GLISTENING PIG CHEEK REST!
for about 20 minutes

slice and serve...
refrigerate left over...if there is any...but wrap in parchment.  the bacon should still be a bit crispy the next day.  reheat a nice thick slice on a medium heat skillet, lightly searing both sides.

Senin, 08 April 2013

Clam Chowder

When I was about twenty-three I took a week long trip to San Francisco.  I immediately fell in love with that glorious part of our country.  The wharf, the trolleys, the funky winding roads, I couldn't get enough.  And of course, one thing I got plenty of, besides truckloads of Ghirardelli chocolate, was lots of creamy clam chowder.  Sitting in an outside cafe, right next to the water and a slab of barking seals, eating fresh clam chowder out of a sour dough bread bowl was about as close to heaven as it's going to get for me!
And while this isn't being eaten out of a homemade sour dough bowl, it's still pretty delicious and definitely reminds me of my blissful week in the Bay Area.  A rich, creamy, chowder chock full of all you love about clam chowder, with less calories.  Bacon, potatoes, lots of clams, and a thick broth, which has a slight and delightful sweetness thanks to the white wine.

For the bread bowl, since I just didn't have it in me to bake me own, I just hollowed out a store bought kaiser roll.  It actually held up very nicely and made the perfect amount to feel warm and satisfied.  My kids also thought being served out of a roll was the coolest thing ever!

Clam Chowder
Adapted from The New Way to Cook Light

Ingredients

1 1/2 cups chopped onion, divided
1/2 cup unoaked chardonnay (I used white wine)
1 (8 oz) bottle clam juice
1 bay leaf
1 tablespoon butter
1 slice bacon, chopped
3 cups diced red potato
1/2 cup chopped celery
1/8 teaspoon ground red pepper
3 tablespoons all purpose flour
1/3 cup water
3/4 cup half and half (I used fat-free)
3/4 cup reduced fat milk
2 cans chopped clams
2 tablespoons chopped chives
1 teaspoon chopped thyme

Directions

1.  Combine 1/2 cup onion, wine, and next 2 ingredients (through bay leaf) in a Dutch oven over medium-high heat; bring to a boil.  Cover and cook 2 minutes; strain through a cheesecloth-lined sieve over a bowl, reserving cooking liquid.

2.  Wipe pan clean.  Melt butter in pan.  Add bacon to pan; saute 3 minutes.  Stir in remaining 1 cup onion, potato, celery and red pepper; saute 4 minutes.  Stir in flour; cook 1 minute.  Stir in cooking liquid and 1/3 cup water; bring to a boil.  Cover, reduce heat, and simmer 30 minutes, stirring occasionally.  Stir in clams, half-and-half and milk; cook 1 minute or until heated.  Stir in herbs.


Jumat, 08 Maret 2013

Bacon and Pepperoncini Stuffed Sweet Peppers

Around Superbowl time a friend and I were commiserating about the fact that our disinterest in sports excludes us from all the great sports fare.  So, our Non-Superbowl, Superbowl party was born.  It basically meant all the game food, none of the game.  Score for us!  (Yes, that's right, I'm not a sports fan, but I'm still a real nice gal, honest!)

Don't you love this colorful bouquet of peppers.  I like to consider this my attempt at being responsible, by bringing veggies that haven't been dunked in hot oil.  Instead they've been stuffed with cheese!  I'll admit that I took a small leap of faith making these, I'd never had anything like this, so I had no idea what to expect.  Let me just tell you, these little babies are TASTY!  Sweet crunchy peppers, stuffed with a creamy filling that has a great tangy/smoky combo.  They would make the perfect appetizer for a party, luncheon or baby/bridal shower.  You've got to give these a try.

Bacon and Pepperoncini Stuffed Sweet Peppers
From The Shrinking Kitchen

Ingredients


2 teaspoons olive oil
2 slices turkey bacon, chopped (I used reduced fat center cut bacon)
1 cup chopped red bell pepper
2 green onions, diced
10 pepperoncini peppers, stems removed and roughly chopped
4 ounces light cream cheese
20 mini sweet bell peppers
 
Directions
 
Wash and cut the stems off the mini bell peppers and set aside.  In a non stick skillet, heat the olive oil.  Add the bacon and saute for a few minutes until it starts to crisp.  Throw the green onions and chopped red bell pepper in with the bacon and continue to saute until the peppers are softened.  Scrape the bacon/onion/bell pepper into the bowl of a food processor and pulse a few times.  Add the cream cheese and pepperoncinis to the food processor and pulse till combined. If the mixture is too thick, add a little juice from the pepperoncini jar.  Spoon the cream cheese mixture into a zip top bag.  Snip off a tiny piece of one corner of the bag.  Fill the cavity of each mini pepper with the cream cheese mixture.  Chill the filled peppers until ready to serve, or at least an hour.  (I thought they were even better the next day.)


Minggu, 30 Desember 2012

"Half Pops" and Bacon Chocolate Cups ...YUM !


POPCORN --- BACON --- CHOCOLATE
crunchy sweet savory
party in your mouth.


"HALFPOPS"...

have you discovered HALFPOPS yet ?!

these are genius in a bag.  you know that crunchy "half popped" little kernel you search for at the bottom of the bowl of pop corn?...well, someone has discovered a way to package those crunchy little bits.  every tiny niblet in the bag is perfectly half popped to perfection.  i haven't run into a solid kernel yet.  how do they do it ?!


an easy party treat to throw together.  this was actually one of my first chocolates this season and it's also the one that everybody flipped over.  not many people have experienced "HALFPOPS" and i'm surprised how many people still haven't hopped on the CHOCOLATE BACON TRAIN...

put all three together and you have a winner !


"HALFPOPS" BACON CHOCOLATES

1# pound (measurement in the raw) of bacon, cooked extra crispy
1# pound of good dark chocolate..."TEMPERED" is best
1 bag of "HALFPOPS" butter and sea salt flavor
1/4 tsp ground chipotle...optional
smoked salt for a sprinkle on top...optional

more of an idea than a recipe, but here it goes...
IN A NUT SHELL... all you're doing is adding bacon and halfpops to tempered chocolate and spooning it into little candy cups.  you chose the ratio of bacon to halfpops.  i didn't measure, but don't skimp on the bacon.

i would cook the whole pound of bacon, but save about 1/5 (cooked) of it for those last few candy cups at the end.
start with about one cup of the half pops and 4/5 of the bacon...add more in when necessary.  i like a lot of chocolate so i make sure the chocolate is filling the cup with no air pockets.  it makes it easier if you place the paper cups in a mini muffin tin.  when all are filled, give them a tap on the counter to settle the chocolate.  sprinkle with a little smoked salt if you want before the chocolate sets.
i really suggest tempering your chocolate because these will have a better snappy chocolate  crunch and will hold up better if giving as party favors.  click HERE for a post i did with some tips and tricks i've learned so far about "tempered "chocolates.
i added more half pops and bacon towards the end...so have some extra on hand just in case you need to get that last bit of chocolate out of the bowl and into a candy cup...not your mouth!


Minggu, 09 Desember 2012

Bacon Peanut Butter Pretzel Chocolates !


1#pound of bacon...

1#pound of chocolate...

a handful of pretzels 

and a little peanut butter...

hands down...call your mama...
shut the front door...
absolutely one of the BEST BITES i have made all year. 


CHOCOLATE...
my newest obsession.

i think this holiday season you might be seeing a lot of chocolates.
i've already made 5 different chocolaty morsels and i can't stop myself from dreaming up new ones.

i'll be posting about the others, but...
this is one of those...stop and take a moment type of unbelievable bites.


BACON PEANUT BUTTER PRETZEL CHOCOLATES

what you'll need...

1#pound of good chocolate...61% works well.  couverture chocolate is preferred.
1#pound bacon...cooked, CRISPY...chopped to small bits
NOTE...bacon is 1# before cooking
small pretzels...for this i used the Snyder's peanut butter pretzel sandwiches because they are small and round... twisted in half.
Jiff creamy peanut butter...natural PB is too runny.
smoked finishing salt, like Maldon 
small cupcake papers.
 mini muffin tins just to help hold the cups.
NOTE...i also made a few GLUTEN FREE by using small gluten free pretzels.

for tempering chocolate...
you'll need a medium glass bowl, digital thermometer and a clean spatula...at no time should ANY moisture touch the chocolate.
i use Alton's method quickly explained below.

put 3/4 of your chocolate in the glass bowl and microwave for 30 seconds.  STIR.  microwave again for 30 seconds.  STIR.  do it one more time.  STIR.
microwave 3-5 more times, stirring well between each time until it reads 100 F degrees.  STIR.
now microwave for 10 second intervals stirring between each time until it reaches 115 F degrees.
remove from microwave and stir.  stir in the 1/4 pound of chocolate (this is called "seeding").  if you have some 100% cocoa butter, stir in 5 grams of that as well. Alton uses the 100% cocoa butter method instead of seeding with chocolate.  i used both.
keep stirring until all chocolate is smooth and it reaches 90 F degrees for dark chocolate...88-85 F degrees for milk chocolate.

while your chocolate is coming down to the 90 F degrees (don't forget to stir!), get everything ready.  prepare pretzels with a small dollop of peanut butter...approximately 25-30 pieces.  make sure they will fit in your cupcake papers.  place paper cups in the muffin tins.
add bacon to tempered chocolate.  keep bowl warm by placing it in a larger bowl lined with a cloth towel so it will be snugly and warm while you work.

add a small amount of bacon chocolate to your paper cups...only do 3-5 at a time.  place the pretzel, peanut butter side down, in the cup on the chocolate you just put in.  push it in slightly.  now add another small amount of bacon chocolate to cover the pretzel and fill the sides.  sprinkle a little smoked salt on top before it starts to harden.  proceed with the next 3-5 cups...
when you have finished 1 muffin tin full, gently knock it a few times on the counter to settle everything...then refrigerate for about 10 minutes...they should set by then.  take them out of fridge and keep in a cool dry place.
keep working quickly until you have filled as many as possible.
i got 25 pieces.

NOTE...i am not a professional chocolate person!  please check links given and seek out any other information necessary.  this is how i do it and my chocolates have been good and snappy for over a week...no blooming, no streaks...i don't have the shiny sheen down yet, but i will soon.

Minggu, 04 November 2012

Chicken Canzanese

We survived! It has undoubtedly been one of the longest weeks of my life, but we're safe and that's what matters. The hurricane hit us around midnight with a screaming loud vengeance. Since my husband was out of town, I spent the night with one little foot under my ribs and one in my face.  My kids were way too scared to go to bed.  I couldn't blame them, the wind made my steel door shake so loudly that you would have thought a heard of aliens were desperately trying to come in.  The power was out that night, and just returned yesterday, six days later.  You never could have told me that the power was going to be out that long.  Luckily, thanks to good neighbors and friends, we all got through it.  My husband made it back safely, and I will never again take heat or light for granted.  My thoughts and prayers to those who lost so much and are still waiting for heat and power.  I hope things return to normal very quickly!

Back to the food...I'm going to just go ahead and say it, this might be the best chicken I have ever had...like, ever.  I'm already a huge fan of dark meat chicken, but add luxurious ingredients like bacon, wine and fresh herbs, and I'm practically floating out of my chair.  I would happily pay good money for something like this at a restaurant.  This is a bit time consuming, but SO worth it.


Chicken Canzanese
From What's Cooking Chicago?

Ingredients

1 tablespoon olive oil
2 ounces of diced prosciutto or bacon (I used bacon)
2 garlic cloves sliced lengthwise
2 garlic cloves, minced
8 bone-in, skin-on chicken thighs and/or drumsticks, (trimmed of excess fat and skin)
2 teaspoons flour
2 cups dry white wine
1 cup chicken stock or broth
4 clove buds
1 sprig of fresh rosemary, minced
15 whole fresh sage leaves
2 bay leaves
pinch of red pepper flakes
1 tablespoon juice from 1 lemon
2 tablespoons unsalted butter
kosher salt

Directions

Pre-heat oven to 325℉, with the rack at middle-lower position. Season the chicken lightly with kosher salt, ground black pepper and garlic powder as desired.

In a large skillet (I used my 12" cast iron skillet), heat 1/2 tablespoon olive oil and saute the prosciutto/bacon until fragrant, and add the garlic slices and minced garlic, cooking for just a minute or so until lightly golden. Remove and place in a small bowl and set aside.

In the same skillet without cleaning the pan, add the rest of the olive oil and heat until very hot. Add the chicken pieces, skin side down, and cook without disturbing for about 8 minutes or until golden brown. Flip pieces over and cook another 5 minutes. You may need to do this in batches. Remove the chicken to a plate and set aside.

Remove some of the rendered fat from the pan, leaving about 2 tablespoons. Make a blond roux by adding the flour to the pan, and stirring and scraping with a wooden spoon or spatula until fragrant, about one minute. Add the wine and broth, slowly, stirring to make a smooth, slightly thin sauce, continuing to scrape the bottom until all the browned bits have been scraped up off the bottom of the pan. If the sauce begins to lump, whisk vigorously until it smoothes out. Add in the whole cloves, red pepper flakes, sage leaves, bay leaves, and reserved prosciutto/bacon and garlic.

Add the chicken to the pan in a single layer, skin-side up so it rests above the liquid. Place the skillet uncovered into the preheated oven and bake until chicken is completely tender, about 1 hour 15 minutes. Check on the chicken after about 15 minutes after you place it in the oven - the broth should be barely bubbling. If it is boiling or not bubbling at all, raise or lower your temperature slightly, accordingly.

Remove chicken from pan to a serving platter and tent loosely with foil, leaving the sauce in the skillet. Remove the sage leaves, rosemary stem, cloves and bay leaves and discard. Place skillet over high heat on the stovetop, and bring the sauce to a boil. Cook the sauce until it has reduced and thickened. Turn off the heat and add the lemon juice, butter, and minced rosemary. Pour sauce around chicken, and serve.
Served with rice to soak of that sauce, and sauteed mushrooms, because well, it just seemed appropriate for this dish.